


 |
IPF H4 Headlight upgrade and ARB wiring harness |
Installation date: 5/20/01
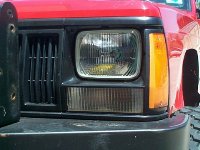
I had been running a set of 55W sealed halogen headlights for almost 4 years and they made a big difference over the OEM 35W headlights, but eventually I decided it was time to really upgrade my headlights. After seeing some photos of the light output of some E-code (euro spec lights) headlights for the Grand Cherokee, I knew I had to get something similar. I’d been hearing a lot about IPF’s H4 replacement headlamps and bulbs, so I thought I’d give them a try. Most people I talked to recommend upgrading the OEM wiring harness to get the most output from the lights, so I picked up the MOO-2 wiring harness from ARB/IPF along with the lights and a pair of IPF Magic-J bulbs with the marine blue after-glow.The Magic-J bulbs are 55/60W Xenon bulbs with a phosphorescent base that comes in either green or blue. When the lights are turned off after running for a while, this base glows in the dark creating a cool visual effect. The output of the glow isn’t really that much, though some people claim it’s enough to see where you’re going in a dark garage, I haven’t tried that personally though. The after-glow effect is really more of a conversation piece than it is functional, so if you don’t care about your headlights glowing in the dark, you might look into different bulbs. At the time of this article, the Magic-J bulbs run about $60 a pair and the IPF H4 headlamps run about $28-$34 a piece.
The light output of the Magic-J’s is incredible though. It’s a very bright white light, similar to the xenon headlamps you see in many luxury imports, you’ll get an idea of what I’m talking about below. These are not those color shifting blue bulbs you seen in so many riceburners though, there is nothing blue about these bulbs, unless you get the blue after-glow, and then they’re only blue once you turn them off. The IPF headlights are designed with a very distinct cut-off line, which you’ll see below, so as long as your headlights are aimed properly, there’s no chance of blinding on-coming traffic. In fact, the IPF’s are probably less offensive to on-coming traffic than the OEM lights.
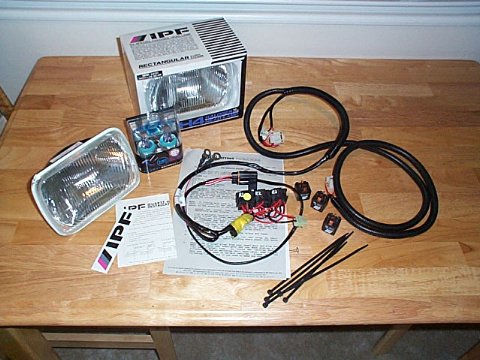
The wiring harness was very simple (3 plugs, 3 relays, a fuse, and wires) but very impressive none the less, definitely a quality kit. The harness alone runs about $90-$100, so it better be impressive for that price. There are cheaper harnesses available from other companies, and I will probably try some of them out when I upgrade the headlights in our TJ and our new ’01 XJ Limited.
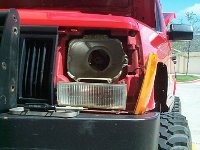
The first step of course is to remove the original headlights. About 4 screws later and the bezel surrounding the headlights comes off (on the 97+ body style there are only 2 screws to remove). Next remove the retainer ring that actually holds the headlight in place, this is held on by 4 screws. The headlight should now “fall” out into your hands – pull it out a bit and pull the plug off the back.
 |
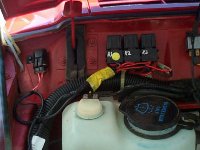 |
Next, if you’re installing the wiring harness you’ll want to find a place to mount the relays and fuse. I chose the top of the firewall. The relays and fuse mount 2 sheetmetal screws, so you’ll want to mark and start a couple of small holes. I’ve found an awl and hammer works great to punch a couple of starter holes. Once the relays and fuse are mounted, run the harness down the fender and out to the headlights.
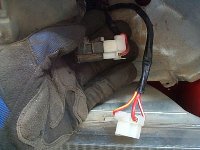
As you can see, the new harness actually plugs into the OEM harness so there’s no splicing or messing with the headlight switch inside. Power to the new harness is supplied directly from the battery, so the connection to the old harness simply serves as the trigger for the relays. The hardest part of the whole install was fishing the new harness down through the nose bezel by the battery, everything else was easy.
 |
 |
Once the harness is run, put the bulbs in the headlights as per the instructions (be very careful not to touch the glass of the bulb with your hands, the oils on your skin will seriously decrease the life of the bulb) and plug the lights into the harness. Replace the retainer ring and the headlight bezel and you’re ready to go! If you look closely at this photo, you can see the phosphorescent ring at the base of the bulb.
Now for the real seller… Below are some comparison photos I took to show the difference the IPF’s make, the left photo is low beams, the photo on the right is highbeams. The lights on the left are the IPF H4’s installed in my ’95 XJ, while the lights on the right are the factory 55W headlights in my ’01 XJ (imagine the difference compared to 35W headlights!!). As you can see, even though both sets of headlights have the same wattage bulbs, the IPF’s have a clear advantage in both color and intensity. You can also see the cut-off line I mentioned earlier. Keep in mind my ’95 XJ has 6″ of lift and 33’s while my ’01 is stock, so that will explain the difference in the heights of the beam patterns.
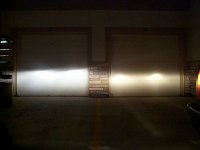 low beams |
 high beams |
2 Comments so far
I have the same harness and there is a connector close to the passenger side light. (You can see the same in one of your pictures) I can not find anywhere to connect that to. Do you need it pluged in to something to complete the circuit?
That’s an extra plug for when the harness is used on some other vehicles (I want to say Toyotas), but it doesn’t get used on Jeeps.