


 TJ rocker guards") |
AEV (ARB) TJ rocker guards |
It only took one good hit to snap the mounting bolts on our driver-side Mopar nerf bar, bend it in half, and then bend it up into the rocker panel, creating a nice big dent… We hammered the rocker panel out as much as possible so it didn’t look quite so bad and started researching serious rocker protection for the TJ. We needed something to cover the damage of course and we wanted something that would offer a setup to aid in getting in and out of the TJ. Eventually we narrowed the choices down to the guards from the FourXDoctor and AEV Conversions. The designs of both are nearly identical, and both received high praise by those running them, but in the end I liked AEV’s overall design a bit better, despite their higher price tag.
The workmanship on these guards is incredible, it looks better than most OEM parts. Every attention to detail has been made. The instructions that AEV includes are very good, so I won’t go into tons of detail here, I’ll just give an overview of the process and how the guards are working out for us. The guards make extensive use of pop rivets, so make sure you’ve got a pop-rivet gun with a long nose handy.
The first things to do are remove the short side flare extension piece or plastic rocker cladding if you’ve got a Sahara, and clean the rocker area.
 |
 |
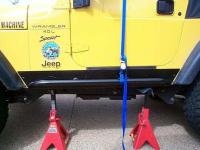
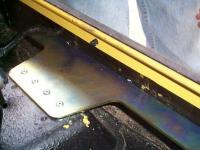
Now it’s time to position and mark where the guards will go. I used a pair of jack stands to hold the guards up initially, then I used a ratchet trap hooked to our Garvin safari rack to pull them up tight against the tub. This worked out great for me since I was doing the install solo – having an extra set of hands would have made the process quicker and easier, but it’s still not bad to do yourself. The indent for the AEV logo goes to the front.
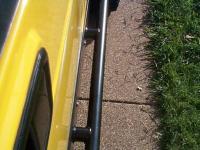
As you can see, the guards fit right between the flares, with a little gap on either side.
After marking the bolt holes you can remove the guards and set them aside. The instructions say to drill all 6 holes in the rocker to 1/4″, but then later you drill out the second and last holes to 7/16″. If you use bullet-tip bits like I do, reaming out holes is a PITA, so read ahead and drill out holes #2 and #6 to 7/16″ to begin with. Why they don’t tell you this in the first place is beyond me…
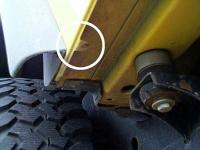
The photo to the right shows the little tab that had to be cut off in order to position the guards where I wanted them.
 |
 |
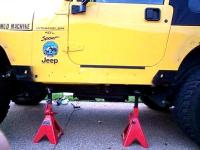
Since our Jeep is yellow, the small gap on either side of the guards was rather noticeable, so I decided to do something about it. I pulled the flares, masked off the body, and painted the area with some semi-flat black Krylon.
This adds some time and trouble to the install, but IMHO it makes for a cleaner and nicer looking final product.
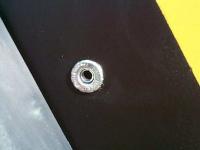
With all that done it was time to install the jack-nuts in the holes that got drilled out to 7/16″. These are funky little things that allow you to use bolts in places were you can’t easily get to the back to use a regular nut. We had trouble installing one of ours (there are four total), so be very careful when installing them. The instructions go over exactly how to use them and AEV includes the special tool you’ll need to work with them.
 |
 |
Now it’s time to start bolting it all up. You’ll need to pull back the carpet from the seat crossmember to position the inside brace. This bracket is unique to AEV’s guards and ties the rocker panel and guard into the interior seat crossmember, strengthening the whole system.
The brace uses the center three bolts of the rocker guard. Once you’ve got it all bolted in, drill the four holes in the cross member and secure the brace using the regular pop-rivets included with the guards. You’ll need to trim the carpet a bit to get it to lay back flat around the brace.
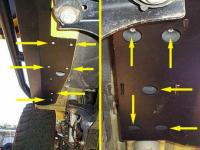
Now it’s time to drill the 11 (yes, 11) holes in the bottom of the tub for the pop-rivets, using the guard as a guide. The photo shows the front mounting points on the left, and the rear mounting points on the right. Here is where you’ll use the special closed-end pop-rivets that are including with the guards.
 |
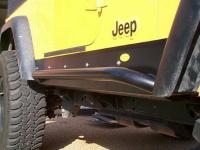 |
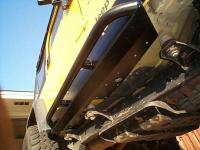
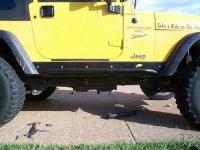
Just do it all again for the other side and you’re ready to hit the trails!
As I said above, the quality of these guards is impressive, I have no doubt they’ll hold up to anything we throw at them, and so far they have. The side bar also works great as a jacking point for a hi-lift.
You’ll probably want to run a bead of clean silicon along the top of the guards to help prevent sand and dirt from getting down there and causing damage.
I honest can’t recommend these things enough, I only wish they made them for XJs! At about $365, they’re probably the most expensive guards on the market, but they should last as long as the Jeep, and they fulfilled everything we were looking for, so in my book they’ve been money well spent.
 |
 |
For more information, contact:
American Expedition Vehicles
Missoula, MT 59806
Phone: (406) 251-2100
Fax: (406) 251-3005
http://www.aev-conversions.com