


 |
DPG Swaybar Disco Cables |
Installation date: 6/15/03
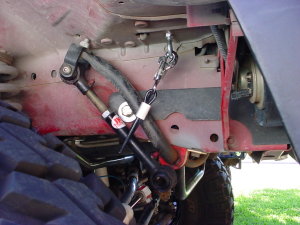
 JKS swaybar disconnects are in my opinion the best disconnects you can get, the only problem is if you’ve got an XJ, they don’t come with any good way to secure them up and out of the way once you disconnect to go wheelin’. For TJ’s JKS includes some retainer studs that you mount to the frame rails, and they’ll work on an XJ if you’ve got a factory front skid plate, but most XJ’s don’t have that, so we’ve got figure out something else to do. Most folks just use zipties or mini bungess cords (which are what I’ve been using) to hold everything up. Apparently Dirk over at DPG Offroad had a similar problem, so he came out with these nifty new disconnect retainer cables. Ah-ha! Just what I was looking for… Now why didn’t I think of that?
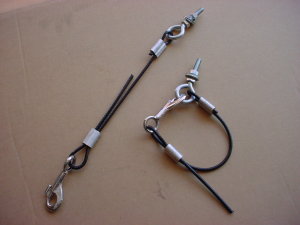
The cables are relatively simple, and relatively inexpensive – about $20 at the time of this article. They’re shipped with only one end totally crimped, that way you can adjust them to fit exactly how you want – the instructions go over setting the length of the cables, more on that later.
 |
 |
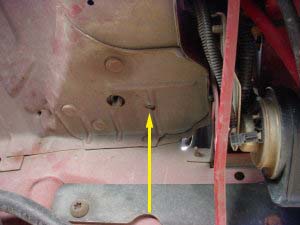
You’re supposed to drill holes in the fender wells to mount the eye-bolts (the instructions tell exactly where to drill these holes), but after looking at my inner fenders, I noticed I already had holes in just the right spot! The holes also turned out to be the right size! Bonus! Mine is a ’95 XJ, and I have no idea what other years would have these holes already drilled, so you might get lucky, and you might not…
 no worries here… |
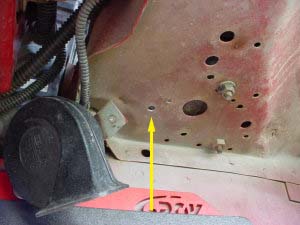
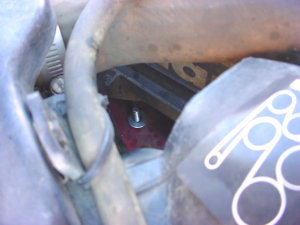 now how am I supposed to get to that? |
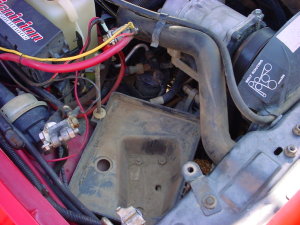
The bolt on the driver’s side comes through just in front of the airbox (above, left). It’s pretty easy to get the washer and nut on this bolt. The one on the passenger side however, comes up nearly under the battery tray (above, right). That’s where it’s supposed to be according to the directions, so it’s time to take out the battery (hey, you needed to clean those terminals anyway, right?).
 |
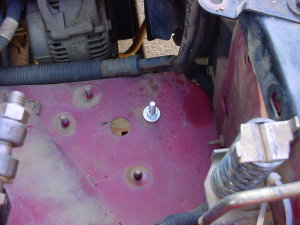 |
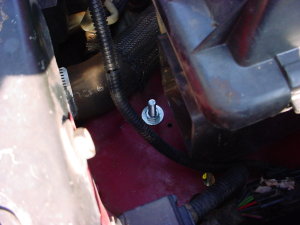
Taking out the battery is pretty easy, there’s two nuts on the retainer plate, then unhook the cables and pull it out. There are 3 nuts in the bottom of the battery tray that hold it down, I think they’re 15mm. Take those off and you can just lift the tray out and have easy access to the top of the eye bolt for the disconnect cables.
 |
 |
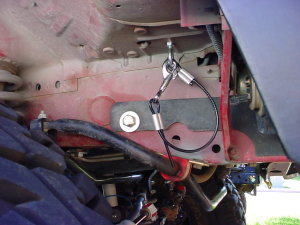
Put all the battery stuff back in and you’re almost done. I take that back, now you are done! One thing I haven’t done yet in the pics above is cut off the excess cable. As I mentioned near the beginning, one end of the cable is left partially crimped so you can adjust the length of the cable to hold the swaybar as tight or as loose as you want. Once you’ve got the lengths set where you want them, crimp the loose end (a hammer works fine) and cut off the excess cable so it’s not sticking out. The cable itself is made of extra flexible, vinyl coated, galvanized steel aircraft cable, so be sure to have a good set of cutters on hand to snip off that long end. You’ll want to do all this before you really bolt the cables up to the fender — makes it easier to crimp that loose end if you can hammer it on the ground or a work bench instead of the frame rail.
The cables are quick and easy to use — just disconnect the endlinks, swing everything up, loop the cable around the swaybar and disconnect, and clip it back to the eye-bolt. The cable clips up and out of the way when not in use so it’s not in the way. Of course, they’ll work with any brand of “swing-up” disconnect (ie: TeraFlex), not just the JKS disconnects (they’re just cables afterall…). Quick, easy, and cheap, what more could you ask for?
For more information contact:
DPG Offroad
PO Box 190
Rose Hill, Kansas 67133
(316)776-9900
info@dpgoffroad.com
http://www.dpgoffroad.com/