


 |
D30 axle tube seals |
Article by Sam Vert.
Mud puddles are fun. There’s nothing quite like tearing through your local mud bog with reckless abandon, giving your Jeep both a mechanical challenge and a new paint job at the same time. And who hasn’t encountered a water crossing at some point or another? I think we’d all agree it’s best to keep mud and water on the OUTSIDE of our rigs, especially out of the inner workings that faithfully take us to and from our favorite wheelin’ location. But if you have a Dana 30 equipped Jeep, this is easier said than done.
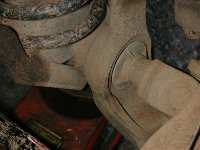
Near the outer end of the inner shafts on that axle the factory places little saucer-like plastic guards designed to keep debris out of the axletubes. They do a fine job of rejecting rocks, dirt and thick mud, but water doesn’t just roll over and quit. We all know if you give water a way in to any place it’s not wanted, it WILL get in there. And the plastic shields don’t offer much resistance.
Enter Drivetrain Direct.
 |
 |
With a little influence from NASCAR technology, they have come up with seals that effectively do just that… actually SEAL your axle tubes! Say goodbye to gray gear oil after every romp in the muck, these gizmos will keep both the water out and the 90 weight in.
The people at Drivetrain Direct were happy to exchange my credit card number for a pair of these innovations and in about a week they were sitting on my doorstep awaiting a new home in my 98 Cherokee sport.
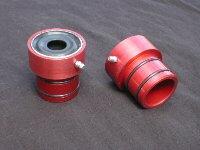
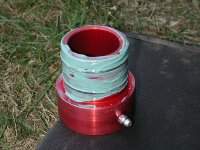
I was rather impressed by the quality of the parts; nicely CNC machined out of aluminum and given a handsome shade of red to attract attention. You can see there are two rubber o-rings that insert into the tube and a zerk fitting that remains accessible after installation. This is where it gets really cool. There are two rubber rings molded to the aluminum that form a pocket around the axle shaft when installed. Pump said zerk full of your favorite grease and…Presto! Instant seal! And since it’s the grease that is making the seal, it shouldn’t go bad for a very long time.But, they weren’t sealing anything sitting in the box so I went to work installing them.
 |
 |
The first thing of course is to set your parking brake and find a floor jack and a good set of jack stands. I did one side at a time and I’ll explain why later. After removing one front wheel of your choice, remove the brake calipers and rotor. I used a 1/2 inch socket to release the caliper and a piece of solid wire to support it, to keep the weight off the brake line. Next I removed the large hub nut off the axle end with a 1-7/16 socket. It wasn’t a perfect fit, I think it’s metric, but it worked well. Then you must use a 13mm 12-POINT socket to get the bearing assembly off the spindle. (In retrospect, I don’t think it was necessary to remove the hub nut. Just pulling off the bearing and taking the axle shaft with it may have been easier or at least eliminated a step, but no harm done.) If you’re going to remove that hub nut, remember it’s on there pretty good, and if both tires are off the ground you’ll just spin the other one all day trying to get it off, hence the one tire at a time method. It’s also easier to remove the lug nuts this way.
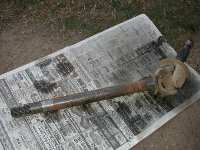
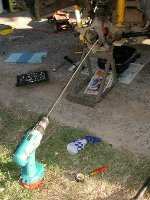
Once you get this far you’ll notice the axle shaft just slides right out of the tube. Cut off the goofy plastic donut and scrub some of the dirt and rust that has inevitably collected on the shaft. I took this opportunity to drain and clean the pumpkin with mineral spirits also. You’ll want to clean the tubes before you put the new seals in. Nylon bore brushes would have been perfect, had I had some. I didn’t, so I fastened a rag to the end of a 1/4 inch threaded rod and stuck it in my cordless and gave it a spin. It works pretty well, and I had some rod sitting around so the price was right.
 |
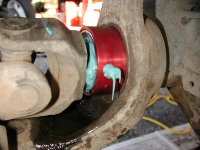 |
Before sliding the new seals in, slather some grease on them. It aids in insertion into the tubes and keeps the o-rings in good shape. I used marine grease, for added defense against water intrusion. They slide right in; you would think they were engineered for this exact diameter tube..oh wait…they were. Silly me. Before sliding the axle shafts back in, put a little grease on the rubber donut to lube the shaft as it goes in. If you’ve kept track of where you put the loose bolts, reassembling the truck is just the reverse of what you just did. If you’re having trouble getting the calipers back on the rotor, take a C-clamp and compress the piston a little. Be sure to use a turkey baster to suck a little brake fluid out of the reservoir first or you’ll force some out when you squeeze the piston.
Lastly, pump that zerk full of grease until it starts to leak out past the rubber membrane and the shaft, and you’re good to go. I again used marine grease; That particular part of the vehicle sees a lot of water. Here in the Pacific Northwest things can get a little soggy, but thanks to these new seals I’m not as leery about hitting the puddles anymore!
For more information, contact:
DriveTrain Direct
1477 Davril Circle
Corona, CA 92880
(888) 584-4327 Toll Free
(909) 272-0158 Local
(877) 550-4327 Toll Free Fax
http://www.drivetraindirect.com/
2 Comments so far
Will these work with cv axles? I have a 2000 wj
I have a 1999 WJ and I too would like to know if they will fit the axles on this vehicle